
Hello sleepy listeners in the Milky Way. This is Space Cat Koko and you are listening to Sleepy Reads. The Galactic Guppy has selected me to create audio logs, also known as podcast episodes, to help with focus, sleep, and relaxation for Earth humans. If you are not an Earth Human, feel free to listen. This podcast is available to all in the Milky Way.
Two vintage Earth days ago, I arrived at the Ice Cream Nebula Recreation Station which is part of the Milky Way Galaxy Parks System. This Rec Station offers themed living quarters in the colors of different types of ice cream. The selection of themes were long, but some choices were Vanilla, Rainbow, Moons of Jupiter, Chocolate, Strawberry, Tutti Fruitti, Nebula, Crater Crusts, Neopolitan, Rocky Asteroid, and Pistachio. I chose Tutti Fruitti since it is fun to say and colorful.
Each time the door opens to my living quarters, the lights turn on gradually from a ceiling light in the shape of a giant whipped cream cloud and from wall sconces shaped in small, whipped cream swirls. Each wall is a different color, and the hues match the floor designs of giant fruit such as, cherries, strawberries, lemons, pineapples, melons, peaches, and more.
The living quarters has a large floor to ceiling windowed dome which makes the room feel very large and open. Every twelve vintage Earth hours, the Ice Cream Nebula comes into view casting a colorful glow into the room. The dome has multicolored chairs in scoop shapes of ice cream. They are soft and squishy, similar to what Earth Humans called bean bag chairs. I have not been here long, but this room has easily become my favorite. Very quiet and peaceful.
There was a small package on my ice cream cone shaped table. It was from the Galactic Guppy Preservation Unit of Vintage Earth Culture. When I opened it, I discovered the first book for me to read, Making a Rock Garden. This reading is only to be used as a reference. Some rocks and plants mentioned in this book could be invasive to you, your environment, and / or others.
Ok, and now, it is time for,
Making A Rock Garden, part one of two.
by Henry Sherman Adams
Published Earth Year 1912
CHAPTER ONE: THE ROCK GARDEN
In Europe, particularly in England, the rock garden is an established institution with a distinct following. The English works on the subject alone form a considerable bibliography.
On this side of the Atlantic, the rock garden is so little understood that it is an almost unconsidered factor in the beautifying of the home grounds. There are a few notable rock gardens in this country, all on large estates, and in more instances some excellent work has been done on a smaller and less complicated scale either by actual creation or by taking advantage of natural opportunities. But, for the most part, America has confined its rock garden vision principally to the so-called “rockery.”
Now, a rockery, with all the good intentions lying behind it, is not a rock garden. It is no more a rock garden than a line of cedars planted in an exact circle would be a wood. A rockery is generally a lot of stones stuck in a pile of soil or, worse yet, a circular array of stones filled in with soil.
A rock garden, above all else, is not artificial; at least, so far as appearance goes. It is a garden with rocks. The rocks may be few or many, they may have been disposed by nature or the hand of man; but always the effect is naturalistic, if not actually natural. The rock garden’s one and only creed is nature.
Rock gardens are of so many legitimate, in other words, natural types, that there is not the slightest excuse for a rockery. Even that commonest of excuses, finding a use for stray stones, falls to the ground. Any close observer of nature is familiar with these types. The natural rock gardens range from the patches of alpine plants above the timber line in high mountains down the lower slopes and through defiles to fields on or near sea level. Not infrequently they come down to the very sea, while sweet waters commonly define and, what is better, are now and then incorporated in, them here a pool, there a brook. The bog, too, the heath and the desert, they take unto themselves, though perhaps only the nearer edge. And does man, by ponderous effort, raise up massive masonry in orderly fashion; one day disorder comes, and nature makes things look natural by another kind of rock garden. Rome’s Coliseum and the ruins of Kenilworth Castle are only two of the unnumbered examples of this.
Here, in a nutshell, are not only the natural variations of the rock garden, but the inspiration. No rock garden worthy of the name has ever been created by man that did not depend upon a study of those that nature has given the world in prodigal abundance. There were the why and the how of it all, and man simply saw and made use of his observations.
The advantages of a rock garden are, primarily, an element of picturesqueness that nothing else can provide, and the possession of a place in which can be grown some of the loveliest flowers on earth that, if they flourish at all, will never do as well in the ordinary garden as in conditions more or less approximating their natural habitat. Also, it may be made a pleasance of extraordinary attractiveness. Occasionally—and here is one of the most important things to be learned about the rock garden–it is the veritable key to the garden situation; there are small places where no other kind is worthwhile, if indeed it is possible.
CHAPTER TWO: THE CHOICE OF A SITE
The best site for a rock garden is where it ought to be. That is a sad truth, for it eliminates some homes from the game; but useless waste of time will be saved if this is recognized at the outset. First cast your eye about and see if you have a spot where a rock garden would look as if it belonged there; that is the supreme test. If one does not seem to belong there, give up the idea philosophically and take it out in enjoying the rock gardens of other people.
As a rule, a rock garden should not be near the house; it is something savoring of the wild that does not fit in with most architecture. Exceptions are when the house is on a rocky site that makes such planting desirable, if not imperative, and a slope from the rear or one side of a house that seems decided enough to permit of a sharp break in the general landscape treatment. Save in these circumstances, it is better that it should not be in sight of the house. This is not so hard as it sounds; even on a small place, the spot is easily concealed by a planting of shrubbery.
Nor should the rock garden, any more than the rockery, be in the lawn unless it is depressed and therefore out of sight, or mainly so, from the level. The depression may be a natural or an artificial one, it may be a brook with high banks, or it may be a sunken pathway. The edge of a lawn is better, a corner of it is better yet, and preferable to either is a bank sloping down from it. The bank on either side of steps leading from one lawn level to another is also a possibility to be considered.
Trees need not be altogether avoided; sometimes they are essential to the pictorial effect. It is not well, however, to place a rock garden near very large trees. The drip is bad, especially for alpines, and the greedy roots not only rob the plants of nourishment but are very apt to dislocate the stones.
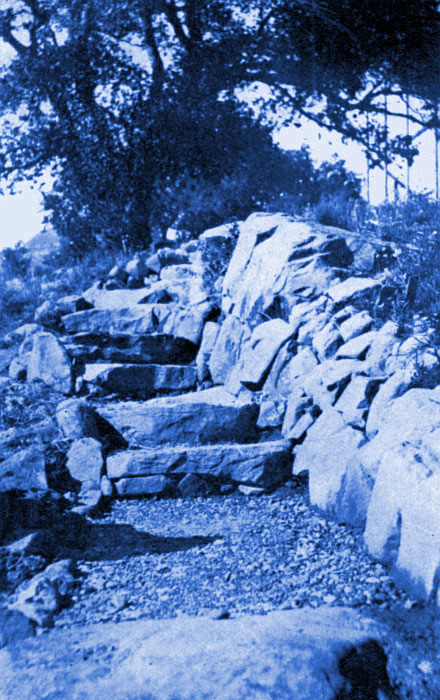
FIGURE ONE: Wherever possible, make the entrance to the rock garden a rough flight of steps. Excavate if necessary. Plant the step crevices as well as those of the side walls.
Somewhere just outside the real garden is the best place; then it is only a step from one little world into another that is altogether different. If the rock garden leads to a bit of wood, either directly or through a wild garden, there will be all the more to rejoice over. The more irregularity the site has, or suggests, the better; a rock garden not only should have no straight lines, but it is not well that all of it should be comprehended in a single view–no matter whether the area be large or small.
What constitutes a good site is well illustrated by one of the existing American rock gardens. The place is large, and in the rear of the house the grounds are level for a considerable distance and then drop with a fairly steep bank to a driveway, below which another terrace leads to a meadow. Instead of being continuous, however, the bank above the driveway is broken by a little glen, seemingly leading nowhere, but actually an entrance to both the rear lawn and the formal garden. In this glen is the rock garden, or rather the main part of it. Though bounded on the north–it runs east and west–by the formal garden and on the south by the lawn, the rock garden can be seen from neither of these, nor from the house. It is conveniently near all three, yet distinctly apart from all. A thin planting of evergreens screens it on the south and east sides, and there is a low hedge between it and the formal garden. The rock garden overflows the glen and runs along the bank on either side, the shady section being devoted to an extensive collection of hardy ferns. Across the driveway there is more rock garden and then a short stretch of dry wall garden. Such a site as this does not have to be found all made. Given any grounds with a bank, and a little imagination, and a glen is a mere matter of shoveling soil. Call it a gorge, if you prefer. Either, in miniature, is a favored rock garden form; so are hill and crest.
Thus far the assumption has been that the rocks have to be gathered up from various parts of the place or brought in from the outside. But many grounds, especially those of country places, have the rocks; often more than are wanted. Although sometimes this is the best of luck, now and then the trouble of blasting and rearranging is about as great as if all the stone had to be found. It does, nevertheless, make easier the choice of a site; where rocks are naturally, there they ought to be. Occasionally the rocks are so disposed that there is no choice; the site settles itself and it is up to you to make the most of it.
A single boulder, a few scattered rocks, or a rocky bank can be converted into a simple rock garden without moving a stone. A little judicious planting and the transformation is complete.
A rock garden with water is a rock garden glorified. Wherever possible, without injury to the main scheme, the garden should be brought to the water. Failing that, bring the water to it, if this is practicable, which can be determined when the site is picked out.
And now, the interlude.
Moon Dauber Delights presents Stuffed Cauliflower
INGREDIENTS
Cauliflower, fat bacon, minced meat, bread crumbs, egg yolks, mushrooms, seasoning of the usual kind, and thin gravy.
Pick over a fine cauliflower and plunge it for a moment in boiling water. Look over it well again and remove any grit or insects. Put it head downwards in a pan when you have already placed a good slice of fat bacon at the bottom and sides. In the holes between the pan and the vegetable put a stuffing of minced meat, with breadcrumbs, yolks of eggs, mushrooms, seasoning of the usual kinds, in fact, a good forcemeat. Press this well in and pour over it a thin gravy. Let it cook gently, and when the gravy on the top has disappeared put a dish on the top of the saucepan, turn it upside down and slip the cauliflower out. Serve very hot.
This recipe is from The Belgian Cookbook. Published in vintage Earth year 1915.
And now … back to … Making a Rock Garden
CHAPTER THREE: THE WORK OF CONSTRUCTION
Spring is the best time to make a rock garden. When the important matter of the proper site has been put in the past, a definite scheme must be planned. Upon the definiteness of this scheme, much of the success of the rock garden will depend. Here desire will have to be subservient to the situation. It is not so much what you want as what is best in the circumstances.
Do not attempt to copy the rock garden of someone else. All the money in the world would not create an exact duplicate for you, since nature has made no two rocks precisely alike. Study them, of course; get all the ideas you can. But study first, and most, nature more particularly its ways in your own neighborhood. Anywhere there is abundant opportunity. Take a leaf or two from the book of the Japanese gardeners. They are past masters of the art of making rock gardens, with a bit of water thrown in. They make use of comparatively few blossoming plants, but their example is invaluable in the disposition of rocks with simple effectiveness, in the simulation of height and distance, in the proper employment of turf, and in the planting of such small trees and shrubs as are suitable for a rock garden scheme.
Measure carefully the space at command, and then lay out the plan on cross-ruled paper. Call each of the little squares a square foot and the labor will be made easy. Next, figure out a good entrance, and, if possible, an equally good exit, the one invisible from the other. Then outline the main path, which should be as devious as the situation allows, and, if byways cannot be added, provide for bays, or more pronounced recesses. Remember that you are not merely to simulate nature; you are, by a process of compressing much in little, to epitomize it.
Then comes the selection of the rocks. Usually the rock close at hand, perhaps on the very grounds, will answer every purpose. If you are not fortunate enough to own any, very likely there is more than one townsman who will be glad to give you all the boulders and smaller rocks that you want, if you will only remove them from spots where they are not desired. The cost of removal, even in the case of boulders of fair size, is not great.
Barring quartz rock, which does not look well, almost any kind of natural stone may be made use of to the best advantage. Artificial stone should be shunned like the plague. Limestone and sandstone are good materials; granite is better. Granite, however, does not stratify, and if stratified effects are desired, another stone must be selected. A good plan is to use more than one kind, but to keep them properly apart. Weather-beaten granite is excellent material, and, in general, it is well to have the rock look anything but newly quarried. Pick out some rocks with a growth of lichen on them and be sure that this is not disturbed by the moving.

FIGURE TWO: Good rock garden planting. Each of the principal species has a soil pocket to itself. Note the effective background and irregular crevices.
Boulders may run up to several tons in weight. Where none is readily obtainable, one can be simulated by ingeniously combining a few small ones and concealing the joints by the planting of such things as stonecrops in earth, which, save in rare cases of sheer necessity, is always used in the construction of a rock garden in place of mortar.
If the site is level, the next step is to change all that–first on paper. Unless the lay of the land is all right at the outset, the configuration of the rock garden must not depend wholly upon the upbuilding; there must be some excavations, but no depressions deep enough to catch and hold water just where you will want to walk.
Aside from the path levels, building begins with the rocks, not with the soil. This is a highly important point. Place the boulders first; they are the big effects. Aside from that, the heaviest work will be out of the way. Then start in with the outlining base rocks. These should be placed with the largest surface to the ground and should vary in size. It is not essential that the lowest rocks should be slightly buried in the ground, but that course is preferable.
When the paths and outer margins have been thus defined, scatter more rocks over the intervening surface, placing them fairly thick but not close together. Next, fill in with soil, packing it firmly and ramming it hard into every crevice. If it fits in with the day’s work, it is not a bad plan to water the rock work well in order to pack the soil, and when resuming the labor on the morrow, to add more soil, well pressed down, before proceeding with the second layer of rock.
This second layer should have the rocks placed with the front edge slightly back from that of the lower row in order to form a slope, though an occasional overhang may be fashioned if required for a certain plant known to abhor a drip from above. The construction then proceeds as before, until the desired height is reached. The height is entirely arbitrary, but some points should be at least as high as the line of vision, as one of the great advantages of a rock garden is the pleasure of enjoying some of the typical rock plants without stooping. The rocks used as fillers should overlap here and there to give strength, but care must be taken to contrive plenty of long soil runs. Eighteen inches should be the very least. A plant like the alpine rock-jasmine is a tiny rosette, seemingly requiring no more than an inch or two of soil, but its roots are likely to be found following an earth-filled crevice in the rocks to the depth of a yard or so. It is because of this deep penetration of roots that the soil should be packed so very firm; the roots must be in no danger of loose soil or of striking a hidden hollow.

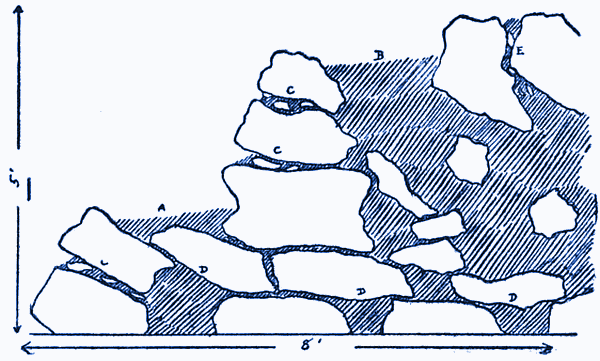
FIGURE THREE: Where a rock would bear too heavily on the one below it, even with soil between, the pressure may be relieved by the use of small stones. The soil run need not be straight, but it must be continuous, so that the roots of the plant may find their way from A through to B.
At no point between two stones should the layer of soil be less than two or three inches thick after being packed hard. If an upper stone is likely to bear down too heavily and crush the plant roots, this may be avoided by placing small stones here and there in the layer of soil. The roots will work between these stones, but there must be a continuous, though not necessarily straight, soil run from the front of the rock work to the solid filling of earth. The run should slope downward slightly.
Rocks calculated to simulate a natural stratification ought to be laid on an incline for proper drainage. Such pieces of rock may also be employed sparsely in wedging, and in the making of the so-called “pockets.”
These pockets are of prime importance in the construction of a rock garden. They hold the only considerable spaces of soil and are the chief means of colonizing plants, thus providing for pronounced color effects. They should break the slopes and be irregular in size, shape, and distribution. The large ones may be easily subdivided by small stones when the planting is done if a further separation of species is desirable. The soil must slope a little from the top, so that there will be no standing water.
FIGURE FOUR: Cross-section of rock garden construction, showing shallow (A) and deep (B) soil pockets; tilting and wedging of rocks (C); bridging (D), and perpendicular crevice soil run (E). Two to three inches of soil between all joints. The lowest rocks are partly buried.
The drainage of a rock garden is of vital importance. There must be plenty of moisture stowed away behind the rocks against the heat of summer, but all excess must be carried away. The garden should drain naturally, as the hills do. If any doubt exists, make a drainage bed of eight inches of clinkers before starting to lay the stones.
The soil should be a good loam with a little peat, and stones varying in size from a mustard seed to an almond. A little manure may be used, but it must be old.
This is end of part one of two, Making a Rock Garden.
If you would like to see examples of rock gardens, there is one on display in The Dome along the spiral walkway and the visitor centers on deck one and deck fifty-nine have rock gardens on both sides of their entrances. If you are not on the Ice Cream Nebula Recreation Station, check with your SUSTU to find the nearest one to you.
You can find Sleepy Reads in your Shared Universal Space Transmission Unit (also known as SUSTU), in your favorite Podcast App, or wherever you listen to podcasts.
Good night, rest well in your space, and ignore all piles of socks.
Thank you for listening. Sleepy Reads is produced by Spicy Pony Design. For more information and transcripts, go to SpicyPonyDesign.com.